Showing posts with label Spring Framework. Show all posts

Dec 22, 2010

How To Resolve 'org.springframework.core.convert.ConversionFailedException: Unable to convert value from type 'java.util.LinkedHashMap' to type 'java.util.Map'; nested exception is java.lang.IllegalArgumentException: Left-hand side type must not be null'

I had been using Spring framework 3.0.0. I had the requirement of passing an attribute map to one of my bean in the application context and I was using the conversion service as shown in the code snippet below
<bean id="conversionService" class="org.springframework.format.support.FormattingConversionServiceFactoryBean" />

When ever I try to set the attribute map to the bean, it was giving me the following exception
org.springframework.core.convert.ConversionFailedException: Unable to convert value {<your value>} from type 'java.util.LinkedHashMap' to type 'java.util.Map'; nested exception is java.lang.IllegalArgumentException: Left-hand side type must not be null

The error was, of course. not helpful and did not give me any clue as to why and from where the problem emerged from. I was thinking that the objects, the key value, that I was passing was not of the expected type. However, since that was not the case, I had to explore a bit across the Internet in this regard. When I explored, I found that there is a problem with the conversionService bean in the Spring Framework version 3.0.0 that has been fixed in Spring Framework 3.0.1. This has been documented as a JIRA issue. A

As pointed out in the JIRA link, I observed that the problem was with the conversion service of the Spring version 3.0.0. Fortunately, the issue has been fixed in the 3.0.1 version itself.fter going through this, I ended up in downloading the latest Spring framework jars and the code started working like charm!

So, whenever you try to add an attribute map to any of your bean in the application context within a Spring 3.0.0 based application, and, if you are using a conversionService that references org.springframework.format.support.FormattingConversionServiceFactoryBean, and if you confront a problem like 'Unable to convert value from type 'java.util.LinkedHashMap' to type 'java.util.Map'; nested exception is java.lang.IllegalArgumentException: Left-hand side type must not be null', then please have a look at the JIRA issue and upgrade your jars accordingly.

Since I thought that this might help a few of you who are confronting similar issues, I have documented this and posted here. I appreciate your hollers/feedback regarding this post any time!

May 10, 2010

Spring Annotations: A Remarkable Reference

I was surfing the Internet and accidentally came across a nice reference for Spring. Since i work with more of Spring annotations, I really found it to be very cool!!! A reference card for Spring annotations is emphatically rare! It is quite useful too!! I thought it is a must have for a programmer who works in java and especially Spring based web application using annotations.

This thought forced me to share the same with you guys too! Here is a list of Core Spring Annotations, Spring MVC annotations, Aspect J and JMX annotations along with JSR 250 and Testing annotations too!! Go through this and have a good time! Keep me posted with your feedback as usual!

Reference Card for Spring Annotations


Source: Dzone.com

May 5, 2010

How To Use @Async in Spring Web Application?

I decided to give the @Async annotation a try! The recently added @Async annotation in the Spring Framework 3.0 seems to be an easy fit for applications that would require asynchrous calls to be invoked while the application is running or deployed! Here is a sample code that can help you with making your @Async annotation work with ease!
  1. As the first step, you have to incorporate the schema location detail and the xmlns detail for the task tag in Spring framework. The xmlns configuration details that you need to include is:
    xmlns:task=http://www.springframework.org/schema/task
  2. The schema location configuration details that you need to include in your application context includes


    http://www.springframework.org/schema/task  
    http://www.springframework.org/schema/task/spring-task-3.0.xsd
    
  3. Next, make Spring container understand that you are going to invoke asynchrous tasks that are annotation driven. So, remember to add the following line in your applicationContext.xml file.


    <br /><task:annotation-driven><br />
  4. After this, check your configuration xml file to ensure that you have implemented the context scanning on the code package where you are going to define the asynchronous jobs that you expect to be run by the spring framework. Let us say, we have a package org.webapp.services.tasks where we are going to have a class that would have all the methods annotated with @Async here and these would in turn be invoked by the scheduler. Then, ensure that you have this package as a part of the component scanning tag within the configuration xml file as follows:


    <br /><context:component-scan base-package="org.webapp.services.tasks"><br />
  5. Now, we are almost complete with the changes in the configuration files. Next, let us go ahead with a class that would have methods annotated with @Async which are in turn the asynchronous tasks that would be invoked within our application. Remember, as discussed earlier, this class needs to be in org.webapp.services.tasks package. Let us refer to this class as MyScheduler.java. The code for this class would look something like:


    <br />package org.test.common.utils.Tasks;<br />import java.util.Date;<br />import org.springframework.scheduling.annotation.Async;<br />import org.springframework.transaction.annotation.Transactional;<br />import org.springframework.stereotype.Component;<br />@Component<br />public class MyScheduler implements Scheduler{<br />@Transactional(readOnly = false)<br />@Async<br />public void testTask() {<br />System.out.println("Starting to process the task at " + new Date()); <br />}<br />}<br />
  6. And that is it! You are done. The @Async tells the spring container that the method underneath is an asynchronous task that would be invoked within the application. You can call this method from any class using the snippet as given below:


    <br />@Autowired<br />private Scheduler s;<br /><br /> s.newTask();<br />
  7. Further, when you use @Async you can return parameters from those methods and that should be Future typed. Say Future etc! That is unbelievable. Even if you want to update the db, you can go ahead and get the current session and process this method within a transaction to make db updates on a periodical basis.
If you find the information pretty helpful, I would really be happy if you would keep me posted via the comments form displayed under this article! If you had wanted some other information related to the same topic, I would suggest you to drop a note to me using the comments form for that would help me in getting back to you with the details you are in need of!


May 4, 2010

How to Implement a Task Scheduler/ Job Scheduler in Spring Framework using Annotations?

I had a chance to analyze how the task scheduler works in Spring framework today!! The recent addition of the @Scheduled and @Async into Spring framework 3.0 forced me to tgive them a try! Emphatically, spring framework is remarkable. With a few tweaks in code, everything gets in place as expected. In this article, let me give you a very brief overview on how to implement a scheduled task in spring using @Schedule annotation! This would be a nice tutorial for a newbie and an intermediate Spring programmer! If you intend to have a scheduled job run periodically and if you are using Spring, please read further and get to know the nuances involved.Let us dive into action right away!.
  1. First and foremost, let us decide on incorporating the task:annotation-driven in the applicationContext.xml file. This is the configuration file that would be loaded by the ContextLoaderListener within your spring application. I have decided to have the task:annotation-driven tag within the application since this is where I would be including the beans that would form a part of my service layer and I am going to include the TaskScheduler class a service in my application.
    Next, go ahead and add the xmlns details to your configuration. The following code needs to be added to the applicationContext.xml file in your application.

    xmlns:task=http://www.springframework.org/schema/task
  2. Further, you have to add the schema location details for the task-annotation driven tag in your applicationContextxml. This is as follows:

    http://www.springframework.org/schema/task  <br />http://www.springframework.org/schema/task/spring-task-3.0.xsd<br />
  3. Note: If you do not add the configurations given in point # 1 and #2 in your applicationContext.xml where we would be defining the services used in our application (I am conidering that I would have a class containing the scheduled jobs as a service and this would be a part of my services package), you are likely to get the "The prefix 'task' for element '' is not bound" error.
  4. Next, you have to make your Spring container understand that you would be having some scheduled jobs within your application and those tasks are driven by annotations. You can do so by adding the following line to the applicationContext.xml file.

    <task:annotation-driven><br />
  5. Now, it is important that the Spring framework should be aware of the class details where you would be using your @Scheduled annotation. For this, let us consider we have a package or.webapp.services.tasks. In this package, let us consider that we have a class MyScheduler.java. This is the class that would contain all the methods which would be invoked as scheduled tasks/jobs in your application. It is important that you add this package in the component-scan tag within your applicationContext.xml as follows:

    <context:component-scan base-package="org.webapp.services.tasks"<br />
  6. Next, we need to code the details of the scheduled job within the class MyScheduler. As a sample, we will have one method testTask. This task would be annotated as @Scheduled with the required attributes. This would in turn make Spring container understand that the method underneath this annotation would be run as a job that is scheduled by the Spring Framework. This can be done as follows:

    package org.test.common.utils.Tasks;<br />import java.util.Date;<br />import org.springframework.scheduling.annotation.Scheduled;<br />import org.springframework.stereotype.Service;<br />@Service<br />public class MyScheduler {<br />  <br />    @Scheduled(fixedRate = 5000)<br />    public void process() {<br />        System.out.println("Invoking testTask at " + new Date());<br />    }<br /><br />}<br />
  7. Attributes for @Scheduled Annotation:If you want a job or a task to be run every 5 secondsm then you need to modify the @Scheduled annotation sued above as: @Scheduled(fixedRate = 5000). If you want a time gap of 5 seconds between the end of previous execution and the start of the succeeding execution then you need to modify the @Scheduled annotation as @Scheduled(fixedDelay= 5000). You can also trigger a cron job and define your cron parameters say try running a job at 6.30pm everyday by using @Scheduled(cron="30 18 * * * ")
  8. And that is it! You deploy the application. You would see the 'Invoking testTask at " + current date' getting printed every 5 seconds in your console!
  9. Further, Even if you want to update the db, you can go ahead and get the current session and process this method within a transaction to make db updates on a periodical basis.
  10. Note: Remember that the methods annotated with @Scheduled should not have parameters passed to them. They should not return any values too.If ever you want the external objects to be used within your @Scheduled methods, you should inject them into the MyScheduler class using autowiring rather than passing them as parameters to the @Scheduled methods
If you find the information pretty helpful, I would really be happy if you would keep me posted via the comments form displayed under this article! If you had wanted some other information related to the same topic, I would suggest you to drop a note to me using the comments form for that would help me in getting back to you with the details you are in need of!Technorati Tags: , , , , ,

Understanding the Different ApplicationContexts in Spring Application

As a beginner to spring, one might often not know the difference between the several applicationContexts that we use in a spring application. Spring documentation is the best place that can really guide you though the process of completely getting this clarified!

But here is the abridged version for a quick understanding of the differences between the various configuration files that we use in a spring application.

  • Understand that the webapplicationcontext denotes the xml configuration file that is invoked by the DispatcherServlet within the spring enabled web application. This is the xxx-sevlet.xml file where you define the details of the handler mappings, view configuration, controller bean definitions and other web related beans. This also includes the definition of the locale and theme resolvers that you might use within your application. You can have a single or multiple web application contexts within your spring enabled web application.
  • The other application contexts that are used within the spring enabled web application are usually loaded by the contextLoaderListener/servlet as shown in the figure below. This can be a single file (applicationContext.xml) or multiple applicationcontexts with names based on the modularization that you make within the application. these application contexts are very different from the web application contexts. They contain the details of the datasources, daos, services, other component beans and the details of the transaction managers used within your application.
  • Note that the webapplicationcontext used within any application would have access to all beans defined within the application contexts that are loaded by the ContextLoaderListener.
                        
  • When you configure the transaction manager, it is important to understand the fact that the Txmanager will search for @Transactional type annotations in all the beans defined within the same application context only! So, this means that you cannot define the TxManager in the applicationContext and have your services and dao beans defined in the webapplicationcontext of your application for this would result in org.hibernate.HibernateException: No Hibernate Session bound to thread. Before you go ahead, ensure that the above differences are very clear and configure your application accordingly!
Technorati Tags: , , , ,

Apr 28, 2010

How To Use Transaction Manager with @Transactional without getting 'org.hibernate.HibernateException: No Hibernate Session bound to thread, and configuration does not allow creation of non-transactional one here' Exception?

Its you readers who post comments on my blog often induce me to post more information and additional write ups here!I sincerely thank you for that induction you create in me! Based on the information requested, I thought of posting an article here that would help many of you (like me) who end up with the very famous "org.hibernate.HibernateException: No Hibernate Session bound to thread, and configuration does not allow creation of non-transactional one here".

If you are looking at the procedure to incorporate the TxManager in your spring application by making use of @Transactional annotation along with org.springframework.orm.hibernate3.HibernateTransactionManager and , here is the right information that you can make use of! This would not only help you to get out of 'org.hibernate.HibernateException: No Hibernate Session bound to thread, and configuration does not allow creation of non-transactional one here' exception but would also help you in understanding the rudiments involved with the transaction very easily.

Here are the basic steps that you can make use of. Let us say that you have an applicationContect.xml(This is the application context that is loaded by the contextLoaderListener/contextLoaderServlet of your application). Let us say that you have a webdispatcherservlet's webapplication context named as application-servlet.xml.

In this case, please follow the steps given below to incorporate the transactions with ease. In my opinion, it is always recommended that you have your service layer transactional . So i intend introducing the @Transactional annotations at the services in the following example!
  1. First and foremost, define the TxManager bean within the applicationContext.xml as shown below. Remember that this context is the place where you should define the component scan for the services and daos present within your application.
  2. <bean id="transactionManager"
    class="org.springframework.orm.hibernate3.HibernateTransactionManager">
    <property name="sessionFactory" ref="defaultSessionFactory" />
    </bean>
    
    <tx:annotation-driven transaction-manager="transactionManager" />
  3. Note that if you define the bean id of your TxManager as transactionManager, the tx:annotation driven tag can be as given below. It literally means that you need not define the name of your transaction manager in the tx:annotation-driven tag. If you have this bean's id as something else other than "transactionManager", you need to have the the additional attribute "transaction-manager" to the tx:annotation-driven tag.
  4. <tx:annotation-driven /><br />
  5. Next,define the xmlns for the tx tag as given below in the same applicationContext.xml
  6. xmlns:tx="http://www.springframework.org/schema/tx"<br />
  7. Further, you need to add the schema location for the Tx tag as shown below in the same applicationContext.xml
  8. http://www.springframework.org/schema/tx <br />http://www.springframework.org/schema/tx/spring-tx-3.0.xsd<br />
  9. Next, go to your daoImpl file say sampleDaoImpl.java and define the sessionFactory as shown below
  10. @Repository("SampleDAO")<br />public class SampleDaoImpl implements SampleDao {<br /><br />    @Autowired<br />    @Qualifier("appSessionFactory")<br />    private SessionFactory sessionFactory;<br />
  11. Remember that you have to use the sessionFactory injected in your daoimpl as shown below
  12. sessionFactory.getCurrentSession().saveOrUpdate(hibernateObject);<br />
    or
    sessionFactory.getCurrentSession().createSQLQuery("<your query here>")<br />
  13. Next, go to your service impl layer. Let us say that you have your service implementation file named as SampleServiceImpl.java. Here, you will have to introduce the @Transactional annotations. Be careful and ensure that you make the transaction read only for the find and get queries while you can make the transaction writeable in methods that updates, saves or deletes the objects in db as follows. Here, you can make the @Transactional annotation at class level as read only. When you have an update method that writes to the db, you can annotate that method with @Transactional(readOnly=false) for this would override the class level annotation incorporated as readonly!
  14. @Service("sampleServiceImpl")<br />@Transactional(readOnly = true)<br />public class SampleServiceImpl implements SampleService {<br />@Autowired<br />@Qualifier("sampleDAO")<br />private SampleDAO sampleDAO;<br />public sampleObject getObject(int id)<br />{<br />return sampleDao.getObject(id);<br />}<br />@Transactional(readOnly = false)<br />public void update(SampleObject sampleObj) <br />{<br />sampleDAO.saveOrUpdate(sampleObj);<br />}<br />}<br />
  15. That is it!!!Your application would have included the TxManager successfully! Your db calls would be then managed by the Spring defined TxManager without any problems from here!
While this depicts a very simple implementation, you can go ahead and change the properties for the @Transctional annotation further to modify the propagation and isolation levels wherever necessary! You can also implement multiple transactional managers if need be by using @Transactional("TxManager1") and @Transactional("TxManager2") and by defining the corresponding TxManagers in your appplicationContext.xml with ease!!! Hope this helps you to circumvent the famous "org.hibernate.HibernateException: No Hibernate Session bound to thread, and configuration does not allow creation of non-transactional one here"! Whatsoever, keep me posted and stay tuned!

If you find the information pretty helpful, I would really be happy if you would keep me posted via the comments form displayed under this article! If you had wanted some other information related to the same topic, I would suggest you to drop a note to me using the comments form for that would help me in getting back to you with the details you are in need of!

Apr 23, 2010

How To Solve org.hibernate.HibernateException: No Hibernate Session bound to thread, and configuration does not allow creation of non-transactional one here?

When we implemented transactions using autowiring and TxManager in the spring config xml file, we ended up in having the well known org.hibernate.HibernateException: No Hibernate Session bound to thread, and configuration does not allow creation of non-transactional one here.

I was googling a bit on "No Hibernate Session bound to thread". Emphatically, I ended up with innumerous answers in several sites on the Internet. Springsource forum is not exception to this! Abundant conversations have been happening on this topic all around!!!

But there were a few best practices that I was able to compile from the chit-chats happening across the Internet. I thought of sharing the same here so that it would help some one some day in the near future!

  1. First and foremost, configure the transaction manager properly : Use @Transaction annotation near your code and have a transactionManager bean in your spring config file.
  2. when integration a transaction manager, do not use hibernate.current_session_context_class and hibernate.transaction_factory_class in the hibernate properties unless you have proper reasons to
  3. Never call sessionFactory.openSession()
  4. Use ApplicationContext rather than using BeanFactory
  5. Have single dao instances running across the Application
  6. Above all, most importantly, ensure that the current application context has the component scan for the beans where you have added the @transactional annotations. as per spring documentation's @ Trasactional usage guidelines,

<tx:annotation-driven/> only looks for @Transactional on beans in the same application context it is defined in. This means that, if you put <tx:annotation-driven/> in a WebApplicationContext for a DispatcherServlet, it only checks for @Transactional beans in your controllers, and not your services. See Section 15.2, “The DispatcherServlet” for more information.

Point # 6 was the culprit in our case and that was then resolved! So the lessson was You are likely to get "No Hibernate Session bound to thread, and configuration does not allow creation of non-transactional one here" if you do not adhere to any of the above pointers.
PArticularly, if you are going to have the applicationContext.xml with the TxManager and the servletname-servlet.xml with the component scan annotations, then you are more likely to get this "No Hibernate Session bound to thread, and configuration does not allow creation of non-transactional one here" exception since the TxManager's transaction holds good for the current application context only (which in this case does not have the bean definitions for the service or the daos where you have the @ Trasactional annotations)

If you find the information pretty helpful, I would really be happy if you would keep me posted via the comments form displayed under this article! If you had wanted some other information related to the same topic, I would suggest you to drop a note to me using the comments form for that would help me in getting back to you with the details you are in need of!

Resolve java.lang.NoClassDefFoundError: org/aopalliance/intercept/MethodInterceptor

Spring 3.0 is emphatically remarkable! When we moved to Spring 3.0, everything worked fine and the team was of course happy! While doing this, we were also trying to move transactions from the old-school way (using hibernate.cfg.xml) to autowiring session factory and making it annotation driven! The latter move forced us to introduce the following code in out applicationContext.xml
<tx:annotation-driven transaction-manager="transactionManager" />


When we thought everything would work, we were surprised to see that on deployment, tomcat reported:
<br />java.lang.NoClassDefFoundError: org/aopalliance/intercept/MethodInterceptor<br />

While this Resolve java.lang.NoClassDefFoundError: org/aopalliance/intercept/MethodInterceptor kept us in surprise, I had to google around a bit! On searching a bit across the Internet, I came across the following solution

Solution:

The previous versions of Spring (<3.0)were shipping AOPAlliance.jar which was required to run the above annotation. In spring 3.0 however, does not come bundles with this jar. As such, if you use Spring 3.0, it is important that you download this jar from this link

Yet another utile pointer that I came across is the fact that there is a JIRA issue to include the AOPAlliance.jar in future releases of Spring! Once I added this jar to the classpath of my application, the Resolve java.lang.NoClassDefFoundError: org/aopalliance/intercept/MethodInterceptor error disappeared!

If you find the information pretty helpful, I would really be happy if you would keep me posted via the comments form displayed under this article! If you had wanted some other information related to the same topic, I would suggest you to drop a note to me using the comments form for that would help me in getting back to you with the details you are in need of!

Spring Integration with Hibernate

I was working on a nice web application that was using Spring, Hibernate, jquery and Apache velocity! The saddest fact was the reality that Spring was not properly integrated into Hibernate and transactions were not properly handled.

At last, after a detailed discussion on what would happen if such an application goes live, the spring has been integrated properly with Hibernate! As soon as one starts integrating Hibernate with Spring, the various options would be
  1. To use HibernateTemplate
  2. To use HibernateDaoSupport
  3. Use plain Hibernate with hibernate.cfg.xml (like what we have been using till date)
  4. Autowire session factory as a bean in the daos
The Pros and Cons
  1. Using HibernateTemplate
  2. HibernateTemplate is a nice API from Spring for easy integration with hibernate. It mirrors all methods exposed to Hibernate session and proves to be handy! Automatic session close and transaction participation proves to be the best part of this API. Additionally this is handy not only for the nice exception translation but also helps a newbie who does not want to handle sessions or transactions by himself. But, with the advent of Hibernate 3.0.1, this API (using HibernateTemplate.find and the like  - This includes defining private HibernateTemplate in the daos and setting the hibernate template while setting the session factory in a setter method say setSessionFactory) just proves to be futile and it is highly recommended that it is better to handle the sessionFactory by ourselves rather than clinging to Spring and depending on it for handling the sessions for us! As such, this proves to be the first level of Spring and Hibernate integration and is a good option for a newbie!
  3. Using HibernateDaoSupport
  4. The process of writing SampleDaoImpl extends HibernateDaoSupport is not doubt a very good option. Here, we would then be using no callbacks and session  = getSession(false) rather than setting the hibernate template via the session factory. This is emphatically a very remarkable API provided by Spring for integration with hibernate and is surely better than the option 1 discussed above since this allows throwing of checked exception within the data access code.
  5. Using plain Hibernate with hibernate.cfg.xml
  6. While this proves to be the mos traditional way of implementation, this is just for the hibernate fans. I am not for such an implementation since there is no need for writing code as given below:
    Session session = HibernateUtils.getSession();
    try{
    Transaction tx = session.beginTransaction();
    session.save(Object o);//o is the incoming object to be persisted
    tx.commit();
    }
    catch{
    (Exception e)
    //code to handle exception
    }
    finally{
    session.close();
    
    
  7. Using Autowiring of the SessionFactory
  8. As far as i see, this is the best way of integrating spring with hibernate. This is not only the latest and the updated way of integration, this proves to be the best solution for designing web application where the developer has a hold on the sessions and transactions though Spring does this in its own way
    <br /><br /><?xml version="1.0" encoding="utf-8"?><br /><beans xmlns="http://www.springframework.org/schema/beans" xmlns:xsi="http://www.w3.org/2001/XMLSchema-instance" xmlns:p="http://www.springframework.org/schema/p"<br />xmlns:context="http://www.springframework.org/schema/context" xmlns:jee="http://www.springframework.org/schema/jee" xmlns:tx="http://www.springframework.org/schema/tx"<br />xsi:schemaLocation="http://www.springframework.org/schema/beans http://www.springframework.org/schema/beans/spring-beans-2.5.xsd http://www.springframework.org/schema/context http://www.springframework.org/schema/context/spring-context-2.5.xsd http://www.springframework.org/schema/jee http://www.springframework.org/schema/jee/spring-jee-2.5.xsd http://www.springframework.org/schema/tx http://www.springframework.org/schema/tx/spring-tx-2.5.xsd"><br /><br /><!-- Auto-detection of the DAOs --><br />    <context:component-scan base-package="webapp.dao" /><br />    <context:property-placeholder location="WEB-INF/jdbc.properties" /><br /><!--<context:property-override location="WEB-INF/override.properties"/>--><br />    <br />    <bean id="dataSource" class="org.apache.commons.dbcp.BasicDataSource" destroy-method="close" p:driverClassName="${jdbc.driverClassName}" p:url="${jdbc.url}"<br />    p:username="${jdbc.username}" p:password="${jdbc.password}" p:maxActive="${dbcp.maxActive}" p:maxIdle="${dbcp.maxIdle}" p:maxWait="${dbcp.maxWait}" /><br />    <br />    <bean id="sessionFactory" class="org.springframework.orm.hibernate3.annotation.AnnotationSessionFactoryBean" p:dataSource-ref="dataSource"<br />    p:configurationClass="org.hibernate.cfg.AnnotationConfiguration" p:packagesToScan="webapp.model"><br />        <property name="hibernateProperties"><br />            <props><br />                <prop key="hibernate.dialect">${hibernate.dialect}</prop><br />                <prop key="hibernate.show_sql">${hibernate.show_sql}</prop><br />                <prop key="hibernate.format_sql">${hibernate.format_sql}</prop><br />                <prop key="hibernate.generate_statistics">${hibernate.generate_statistics}</prop><br />            </props><br />        </property><br />       <br />    </bean><br />    <br /> <tx:annotation-driven transaction-manager="txnManager"/> <br /> <bean id="txnManager"<br />        class="org.springframework.orm.hibernate3.HibernateTransactionManager"<br />        p:sessionFactory-ref="sessionFactory"/><br /><br /></beans><br />
    The corresponding DAO class is as below
    @Repository<br />@Transactional<br />public class SampleDaoImpl implements SampleDao {<br /><br />  @Autowired<br />  SessionFactory sessionFactory;<br />

If you find the information pretty helpful, I would really be happy if you would keep me posted via the comments form displayed under this article! If you had wanted some other information related to the same topic, I would suggest you to drop a note to me using the comments form for that would help me in getting back to you with the details you are in need of!

Mar 31, 2010

How to Use Log4j?

A very simple incorporation of log4j is here!If you really want to know as to how to incorporate log4j logging in your application, here are the details. Though this is simple, I see a bunch of questions related to this in every java related forum and hence I thought of posting this blog!

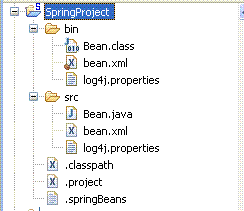
  • Let us have a simple Bean.xml and Bean.class. the xml file has the bean definition and the bean class just prints a string. This is a very simple application written to make you all understand the incorporation of log4j!

  • Just create a Spring Project in eclipse (since am using a bean and bean.xml is being used for configuring the bean). The project hierarchy is as shown below. You also have a log4j.properties file (empty file) in the classpath of this project as shown below:


  • Select the project.Right click and go to properties. Here you can add the required jars. For the implementation of log4j in a spring project, you would need
  1. Spring jars (all the 3.0 version jars)
  2. log4j.jar(latest)
  • Now add the following code to your log4j.properties.


# Set root category for logging error messages
log4j.rootCategory=ERROR,AppAppender

# Debug statements logged by Spring framework.
log4j.category.org.springframework=ERROR, AppAppender

#AppAppender is set to DailyRollingFileAppender and new file rolls every day.
log4j.appender.AppAppender.File=/logs/application.log
log4j.appender.AppAppender=org.apache.log4j.DailyRollingFileAppender
log4j.appender.AppAppender.DatePattern='.'yyyyMMdd
log4j.appender.AppAppender.layout=org.apache.log4j.PatternLayout


  • Now just run bean.java as a java application. Only errors get printed in the log gile.

If you want to change the level of logging, you can make the warninggs or information to get printed in the log file by changing the log4j.rootCategory to INFO, WARN etc.

  • If you have a directory hewrarchy in your application, you can enable logging levels for each of the package by adding an entry as

<br /><br />log4j.category.org.<your package structure>==ERROR, AppAppender<br /><br />


  • AppAppender is nothing but a file in the logs folder under c: whose layout, date pattern and type are as described in the code above. Here, it is a daily rolling appender. A new file gets created everyday and the old file is stored after being renamed with proper dates.


Spring Explorer View in Eclipse 3.5

I am working with Spring 3.0 and I use Eclipse as my IDE. As a novice in the arena of Spring, I was pretty much curious to make use of STS! Developers who are using Spring are really fortunate to have the STS plug-in in eclipse. That is simple awesome and cool!!

The details of installation and configuration for a simple project is given below in this post. I was working at it yesterday and thought of sharing this to all since what took 4-5 hours for me would just be completed in minutes for you!

  • From Eclipse --> Help --> Install New Software and by making use of the update site SpringSource Update Site for Eclipse 3.5, I was able to configure STS in my eclipse Galilee with ease. Please find the figure below and ensure that the following are checked when you get ahead to the update site for the installation of STS
  • On clicking Next and Finish, you should be able to get through the installation within minutes!
  • After this,Restart Eclipse!
  • Once you do this, right click on your project and click Spring Tools --> add Spring Project Nature as shown below
  • On adding the Spring nature to your web application, your project in eclipse would show up as given below:
  • Further to this, go to Project --> Properties --> spring. I am considering a simple spring application. Enable Project specific settings in this window that comes up
  • In project validators tab, ensure that Spring validators and Bean validators are checked as shown below:
  • In project builders tab, ensure that AOP Reference Model Builder and Spring Bean Meta Data Builder are checked as shown below. Then click ok
  • After this, goto Beans Support under Spring as shown below. Here scan and select the list of configuration xml files that you have in your spring application.
  • Once you do this, goto Project menu --> Check the entry 'Build Automatically'
  • Now select the project in the Package Explorer and then go to Window menu --> view --> Other. Here click on Spring Explorer to see the bean and config file listing as shown below. Right click on the xml file and from the context menu, click @RequestMappings


Awesome!!You would be able to see all the request mappings within your application in a single screen view here!!!Pretty awesome and very useful indeed!!!!!The Spring Explorer view in STS is just too cool and superb!! Hats off to the Spring tool developers who did this great work in the customization of Spring Explorer view in Eclipse!

If you find the information pretty helpful, I would really be happy if you would keep me posted via the comments form displayed under this article! If you had wanted some other information related to the same topic, I would suggest you to drop a note to me using the comments form for that would help me in getting back to you with the details you are in need of!

Mar 30, 2010

Spring Framework Fundamentals: A PPT

Here is a power point presentation for those who are very new to Spring Framework. I prepared it for my use and thought of putting it up in my blog since that would be useful for some one too!!!

The spring fundamentals ppt is available in the following location.

PPT on Spring Basics

Do post in your comments if the spring basics ppt was really useful for you!

Jan 26, 2010

How to Resolve java.lang.NoSuchMethodError: javax.persistence.Persistence.getPersistenceUtil()Ljavax/persistence/PersistenceUtil?

I had a chance to have a look the new features of Spring 3.0 today. The validation and formatting that is implemented as a part of JSR-303 implementation seems to be very exciting and interesting. Of course, it made me feel that we are moving towards codeless web based applications sooner or later!

I was very much curious to do a proof-of-concept application for this implementation. So I downloaded the Spring3.0 jars and made use of Hibernate Validator 4.0.2 GA version and validation-api-1.0.0 GA version.I had been using java 1.5

After removing all the old jars and even after implementing everything whatever was required, I was stuck with the following error

java.lang.NoSuchMethodError: javax.persistence.Persistence.getPersistenceUtil()Ljavax/persistence/PersistenceUtil


Please find the stack trace below:

<br />SEVERE: Servlet.service() for servlet springapp threw exception<br />java.lang.NoSuchMethodError: javax.persistence.Persistence.getPersistenceUtil()Ljavax/persistence/PersistenceUtil;<br /> at org.hibernate.validator.engine.resolver.JPATraversableResolver.isReachable(JPATraversableResolver.java:33)<br /> at org.hibernate.validator.engine.resolver.DefaultTraversableResolver.isReachable(DefaultTraversableResolver.java:95)<br /> at org.hibernate.validator.engine.resolver.SingleThreadCachedTraversableResolver.isReachable(SingleThreadCachedTraversableResolver.java:47)<br /> at org.hibernate.validator.engine.ValidatorImpl.isValidationRequired(ValidatorImpl.java:761)<br /> at org.hibernate.validator.engine.ValidatorImpl.validateConstraint(ValidatorImpl.java:331)<br /> at org.hibernate.validator.engine.ValidatorImpl.validateConstraintsForRedefinedDefaultGroup(ValidatorImpl.java:278)<br /> at org.hibernate.validator.engine.ValidatorImpl.validateConstraintsForCurrentGroup(ValidatorImpl.java:260)<br /> at org.hibernate.validator.engine.ValidatorImpl.validateInContext(ValidatorImpl.java:213)<br /> at org.hibernate.validator.engine.ValidatorImpl.validate(ValidatorImpl.java:119)<br /> at org.springframework.validation.beanvalidation.SpringValidatorAdapter.validate(SpringValidatorAdapter.java:74)<br /> at org.springframework.validation.DataBinder.validate(DataBinder.java:684)<br /> at org.springframework.web.bind.annotation.support.HandlerMethodInvoker.doBind(HandlerMethodInvoker.java:746)<br /> at org.springframework.web.bind.annotation.support.HandlerMethodInvoker.resolveHandlerArguments(HandlerMethodInvoker.java:296)<br /> at org.springframework.web.bind.annotation.support.HandlerMethodInvoker.invokeHandlerMethod(HandlerMethodInvoker.java:163)<br /> at org.springframework.web.servlet.mvc.annotation.AnnotationMethodHandlerAdapter.invokeHandlerMethod(AnnotationMethodHandlerAdapter.java:414)<br /> at org.springframework.web.servlet.mvc.annotation.AnnotationMethodHandlerAdapter.handle(AnnotationMethodHandlerAdapter.java:402)<br /> at org.springframework.web.servlet.DispatcherServlet.doDispatch(DispatcherServlet.java:771)<br /> at org.springframework.web.servlet.DispatcherServlet.doService(DispatcherServlet.java:716)<br /> at org.springframework.web.servlet.FrameworkServlet.processRequest(FrameworkServlet.java:647)<br /> at org.springframework.web.servlet.FrameworkServlet.doPost(FrameworkServlet.java:563)<br /> at javax.servlet.http.HttpServlet.service(HttpServlet.java:637)<br /> at javax.servlet.http.HttpServlet.service(HttpServlet.java:717)<br /> at org.apache.catalina.core.ApplicationFilterChain.internalDoFilter(ApplicationFilterChain.java:290)<br /> at org.apache.catalina.core.ApplicationFilterChain.doFilter(ApplicationFilterChain.java:206)<br /> at org.apache.catalina.core.StandardWrapperValve.invoke(StandardWrapperValve.java:233)<br /> at org.apache.catalina.core.StandardContextValve.invoke(StandardContextValve.java:191)<br /> at org.apache.catalina.core.StandardHostValve.invoke(StandardHostValve.java:128)<br /> at org.apache.catalina.valves.ErrorReportValve.invoke(ErrorReportValve.java:102)<br /> at org.apache.catalina.core.StandardEngineValve.invoke(StandardEngineValve.java:109)<br /> at org.apache.catalina.connector.CoyoteAdapter.service(CoyoteAdapter.java:293)<br /> at org.apache.coyote.http11.Http11Processor.process(Http11Processor.java:849)<br /> at org.apache.coyote.http11.Http11Protocol$Http11ConnectionHandler.process(Http11Protocol.java:583)<br /> at org.apache.tomcat.util.net.JIoEndpoint$Worker.run(JIoEndpoint.java:454)<br /> at java.lang.Thread.run(Thread.java:595)<br />


It was almost 6-8 hours, I kept trying to do away with this problem since a colleague of mine seemed to get away with it in java 1.5. The following were the pointers that I understood as a result of my research googling the Internet!
  • The org.springframework.validation.beanvalidation.LocalValidatorFactoryBean while calling the SpringValidatorAdapter's validate(), invokes the Hibernate validator's ValidatorImpl.validate() method.
  • The hibernate validoator 4.0.2 GA version has a very strong dependency on JDK6 which contains the Persistence class with javax.persistence.Persistence.getPersistenceUtil()
So,I finally upgraded my machine to Java 6. It was just a miracle. Everything started working without problems and errors disappeared!!!